In the ever-evolving landscape of database management, MongoDB stands tall as a reliable choice for developers. In this guide, we’ll explore the seamless integration of MongoDB into your local environment using Docker on Windows. Follow the step-by-step instructions to ensure a smooth setup and unleash the potential of MongoDB without the typical installation hassles.
prerequisites:
- Need Desktop Docker App
- if you are using VS code then – Docker Extension (it easy not need to write command)
- if you are using CMD/Terminal then ,execute below commands.
What is Docker?
Docker is a platform designed to simplify the process of developing, shipping, and running applications within containers. Containers are lightweight, standalone, and executable packages that include everything needed to run a piece of software, including the code, runtime, libraries, and system tools. Docker ensures consistency across different environments, making it an ideal solution for developers working on various projects.
Installing Docker Desktop
To get started with Docker and facilitate the integration with MongoDB, you’ll need to install Docker Desktop on your local machine. Follow these steps:
- Visit the Docker Website: Navigate to the official Docker website and download the Docker Desktop installer suitable for your operating system (Windows/Mac).
- Install Docker Desktop: Run the installer and follow the on-screen instructions to install Docker Desktop on your machine. This process may require administrative privileges.
- Launch Docker Desktop: Once the installation is complete, launch Docker Desktop. On Windows, you can find the Docker icon in the system tray. On Mac, it will appear in your applications.
- Verify Installation: Open a terminal or command prompt and enter the following command:
docker --versionYou should see information about the Docker version installed, confirming a successful installation.
Understanding the Docker Compose File (docker-compose.yml)
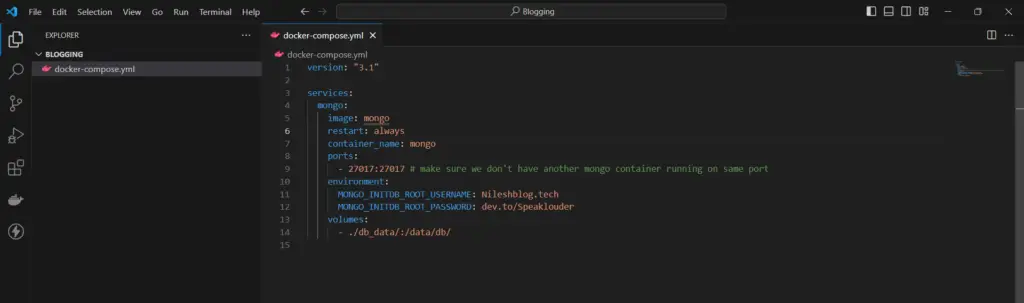
Let’s kick off by deciphering the docker-compose.yml file, a crucial element in our MongoDB-Docker integration journey.
version: "3.1"

services:
  mongo:
    image: mongo
    restart: always
    container_name: mongo
    ports:
      - 27017:27017
    environment:
      MONGO_INITDB_ROOT_USERNAME: NileshBlog.Tech
      MONGO_INITDB_ROOT_PASSWORD: SpeakLouder
    volumes:
      - ./db_data/:/data/db/
version: "3.1": Denotes the Docker Compose file version being used.services: Defines the services we’re using in our Docker setup.mongo: Service name for our MongoDB container.image: mongo: Specifies the MongoDB Docker image to be used.restart: always: Ensures that the MongoDB container restarts automatically in case of failure.container_name: mongo: Assigns a specific name to our MongoDB container for easy identification.ports: - 27017:27017: Maps the host machine’s port 27017 to the MongoDB container’s port 27017.environment: Sets up the initial MongoDB root username and password.volumes: - ./db_data/:/data/db/: Links a local directory (./db_data/) to the MongoDB container’s data directory.
Installing MongoDB on Your Local Machine Using Docker
Now, let’s dive into the installation process.
Step 1: Create a Docker Compose File
Begin by creating a file named docker-compose.yml and copy the aforementioned YAML configuration into it.
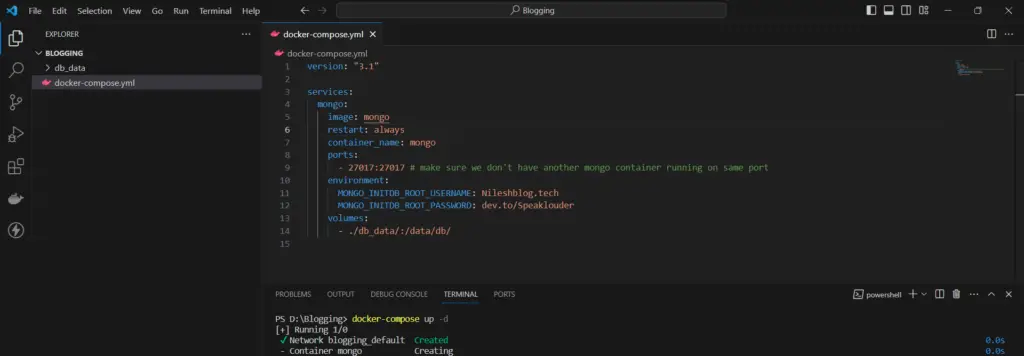
Step 2: Run Docker Compose
Execute the following command in the terminal:
docker-compose up -dThis command will initiate the MongoDB container in detached mode, allowing you to continue working without interruptions.
Step 3: Verify the Installation
Ensure MongoDB is up and running by accessing it via the MongoDB shell:
docker exec -it mongo mongo -u NileshBlog.Tech -p SpeakLouder--authenticationDatabase adminYou are now connected to your MongoDB instance!
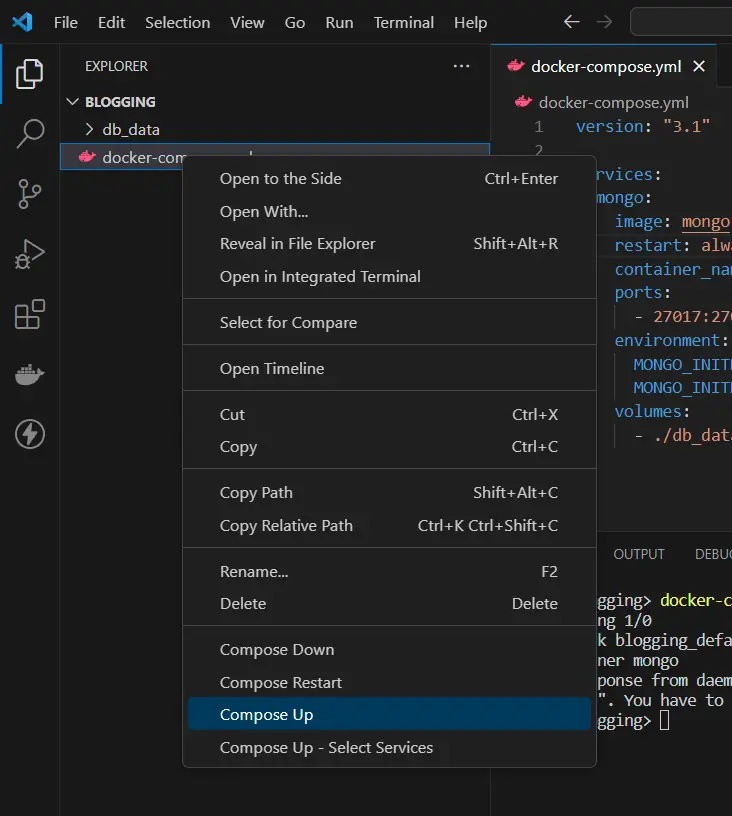
Docker-compose Executing using VScode Extension
- Right click in the docker-compose.yml
- you will go lot of option
- click on : Compose up
- It will execute All command.
- to stop : clicked on Compose Down
Connecting to MongoDB Docker Container
To interact with your MongoDB container, you need to connect to it from your application or a MongoDB client. Use the following connection string:
mongodb://NileshBlog.Tech:SpeakLouder@localhost:27017/adminReplace Nilesh and raut with your specified username and password.
Tips for Efficient MongoDB Docker Usage
- Data Persistence: Leverage Docker volumes for data persistence, ensuring your data survives container restarts.
volumes: - ./db_data/:/data/db/ - Customize Authentication: Modify the
MONGO_INITDB_ROOT_USERNAMEandMONGO_INITDB_ROOT_PASSWORDin thedocker-compose.ymlfile for enhanced security. - Mapping Ports: Adjust the port mapping in case port
27017is already in use on your machine. - After Connecting the App with DB you can easily perform CRUD operations on Mongodb Instance.
Conclusion
In conclusion, deploying MongoDB on your local machine using Docker provides a flexible and efficient development environment. Follow the steps outlined in this guide to set up MongoDB seamlessly on Windows. Embrace the power of Docker to simplify your MongoDB installation and enhance your development workflow.
Trusted Reference Sources:
Other Topic Related to Javascript :
- Magic of Converting Values to Strings in Javascript
- Ways to set Default values in Javascript 🎃🔰
- How to Create Multi-Line String in Javascript
Your support will help me continue to bring new content. Love Coding! 🚀